Objective:
By the end of this lesson, students will be able to evaluate how photojournalist Daniella Zalcman communicates interviews with blended photography in order to create their own blended portraits that communicate how their identities are impacted by significant memories.
Introduction to Visual Storytelling:
Visual storytelling is simply writing in tandem with photographs or video to create vivid stories using signs, symbols, and metaphors. Visual storytellers use images to communicate information and feeling. In this lesson, students will explore how they can use photography and video to communicate the connection between their pasts and their identities.
Explore: Telling Stories with Blended Photographs
Award-winning photojournalist and Pulitzer Center grantee Daniella Zalcman created a way to merge memory into the still portraits she took to document Indigenous people who were forced to attend government-mandated residential schools as children. Zalcman’s project “Signs of Your Identity” utilizes double-exposure portraits and interviews to explore the lasting impacts of government-mandated residential schools for Indigenous children in the United States and Canada.
Research led her to document a part of North American history she’d never learned about in school. “I had no idea about this,” Zalcman says. According to the Canadian Broadcasting Channel news, Indigenous Canadian children, some as young as seven, were removed from their homes and reservations, and sent to boarding schools in order to be educated under a government-sponsored policy called “aggressive assimilation.” That policy aimed to bring Native students into the “mainstream.” The practice ended in 1996.
1. Click on the link below to hear why Daniella Zalcman thinks understanding the past is key to telling a stronger story.

Valerie Ewenin. Image by Daniella Zalcman. Canada, 2015.
2. Read the following quote by Valerie Ewenin, the subject of the photo above:
“I was brought up believing in the nature ways, burning sweetgrass, speaking Cree. And then I went to residential school and all that was taken away from me. And then later on forgot it, too, and that was even worse.”
Analyze her words, and then revisit the image. Consider the following:
- What do you notice about the eyes and the mouth in this portrait?
- How does that relate to the story Daniella Zalcman is telling?
3. Reflect: Zalcman’s double-exposure portraits tell a symbolic story. The portraits combine the past with the present, showing faces of former boarding school students blended with a landscape from their residential school memories. As an artist, Zalcman hopes the lack of instant clarity in her portraits will draw viewers closer in, to examine the pieces, deciphering what they can from her constructed portraits. How can you apply this technique to communicate how memories impact your identity, or the identities of people in your communities?
Analyze: How to Compose a Portrait
In order to create your own double exposure portraits, photographers must first understand the basics of classic portraiture.
1. Take a look at the following image from Daniella Zalcman and consider the following:
- How close do you think Zalcman was to the subject?
- What directions do you think she gave the subject?
- What do you notice about the color and composition? Why do you think Zalcman made these choices?

Image by Daniella Zalcman. Canada, 2015.
Daniella Zalcman’s series includes head and shoulder portraits that are made using a medium format camera. She composes her square frame to capture the subject’s head and shoulders against a blank background. The main variation in the portraits is the position of the face. Here are three examples to compare.

Images by Daniella Zalcman. Canada, 2015.
The portraits are framed with approximately the same amount of headroom. Headroom is the space from the top of the head to the top of the frame. Consistency in style strengthens a photographer’s story.
2. Click on this link to explore portraits from Daniella Zalcman and consider the following:
- How does the story change when the subject is staring directly at the lens vs. turning in profile?
- Do their eyes stare into the distance or turn inward? Does the sitter look directly at the lens, to the side, or into the distance?
- How does the direction of the subject’s gaze change the story and/or feeling?
- How does the image blended with the portrait suggest a story about the person’s life?
When taking head and shoulder portraits, the artist collaborates with the subject. Talk with your subject, create a comfortable atmosphere. Prepare questions. Your conversation will also spark specific visual ideas to then use when blending a second image with the portrait.
Analyze: Double-Exposure Images that Communicate Identity
Double-exposure means that two distinct images are playing with each other to compose a greater sense of character. How will you layer a visual story onto a person’s face, however opaquely?
1. Pick one blended portrait from Daniella’s portfolio. In pairs, or small groups, describe how Zalcman blended two images to work in tandem for the purpose of communicating a story.
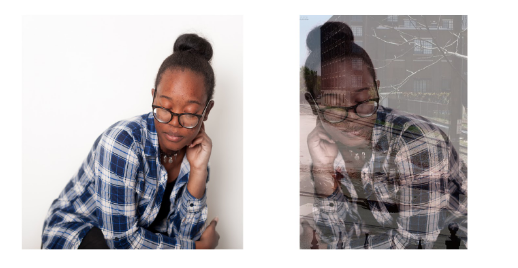
2. Take a look at the following examples of 8th grade student portraits done in the double-exposure style. How does the portrait work in tandem with a second image to communicate a story about the subject’s identity?

Image by Diana Greene and students from The Arts Based School in Winston-Salem, NC. United States, 2018.

Image by Diana Greene and students from The Arts Based School in Winston-Salem, NC. United States, 2018.
Students created the portraits above in the final days before moving on to many different high schools. The images were composed one month before their 8th grade graduations. They wrote notes, reflecting on their time time at their school. Using those reflections as inspiration, they created a second image to layer on top of their head-and-shoulders portrait.
CREATE: Double-Exposure Self-Portraits
1. On your own, or with a partner, reflect on the following:
- What are important parts of your identity that you want to communicate visually?
- How can you compose a head and shoulders portrait to communicate a part of your identity? Which direction will you face? How will you direct your gaze?
- What second photo could you blend with your portrait to communicate a part of your identity?
2. Use your plan to create double exposures using the same tools as the students above.
PhotoLayers is an application available on iOS and Android devices for $0.99 (USA), which allows you to seamlessly blend images together. Click here for a written tutorial the explains how to navigate the app. Diana Photo is also available on iOS and Android for free, although this app will imprint a logo on your image.
3. Share your images with Pulitzer Center and photojournalist Daniella Zalman by emailing [email protected] or by posting to Instagram and tagging @Theempathygap
Extension: Creating Double-Exposure short films
Double exposure is a tool that can be used with video as well. It’s relatively easy. Take a look at the link below. Filmmakers producing the short film “Placing Identity” created a short video portrait using double-exposure to portray Charlene Hunt. Hunt is a member of the Lumbee Tribe in North Carolina. Students from R.J. Reynolds High School interviewed her about identity and place, and asked her to describe a landscape that was central in her childhood while creating the "Placing Identity." She explained the importance of the Lumber River, which became the second layer of video in our double- exposure portrait.
When creating double exposure videos, it is crucial to keep a few things in mind.
- Make your subject comfortable. Position them in the frame, always shooting horizontally.
- Offer them a relevant idea to think about. With Charlene Hunt, we asked her to imagine being at the Lumber River as a child.
- Next, find a location that relates to the story you’re telling. If possible, use a tripod; otherwise, hold steady, keep still, and stick with your shot.
- Videotape your subject for 2 minutes. Record four different shots:
- 30 second close up
- 30 second medium shot
- 30 second pan from left to right
- 30 second pan from right to left (pan slowly; practice)
And, or course, remember to shoot video horizontally.
Reflection: What is the impact of visual storytelling?
The beauty of visual storytelling is that it allows information to be shared in ways that are symbolic, contextual, and open to inquiry. When well-composed images link with the story your subject is telling, the content comes alive. Visual storytelling digs deeper below the surface. As one student filmmaker observed, storytelling is part visual, part audio, and part content.
The camera is a way for creative journalists to capture stories that bring people to life and compose a more complete portrait, one that deepens the sense of identity of the person featured on the screen.
Click here to see how this lesson supported the creation of the original film “Placing Identity.” The film was produced by journalism students from R.J. Reynolds High School in Winston-Salem, NC to explore how our identities are impacted by our physical environments.